When I started as a beginner Product designer,
I always wondered how professional sketchers draw so fast and so well!
One of their main secrets is drawing these imaginary lines called: Contour lines.
Before starting, remember to claim your FREE copy of the Designer Starter Kit here
- How to Draw Contour Lines | Tips & Tricks
How to Draw Contour Lines | Tips & Tricks
What are Contour Lines
Contour lines are imaginary lines that give you information on the surface of a volume.
You can communicate on the form by drawing them very fast. You don’t have to spend time on shading with a gradient of grey or color.
This is a great time saver for designers who need to draw and show their ideas fast.
Contour lines are more than just imaginary lines.
They are powerful tools that can help you visualize and communicate the shape and form of any object in three dimensions. Whether you are sketching a product, a character, or a landscape, contour lines can help you express your ideas quickly and effectively.
In the example below you can see how you could show a bent surface by curving the lines on the surface.
What are the benefits of drawing with contour lines
1- Show your ideas fast
Contour lines are essential for designers who need to draw and show their ideas fast.
As a designer, you need to be productive. On the opposite of an artist, you have a deadline to follow.
This is why being able to drop your ideas fast on paper can be critical.
2- Save time
Contour lines can help you create realistic and expressive sketches that capture the essence of your design.
By using contour lines, you can save time and energy, and focus on the most important aspects of your design.
Plus, since you have not spent too much time on a sketch, it would not be an inconvenience to redraw more proposals for your project.
3- Contour lines help to instant visualize in 3 dimensions
Contour lines follow the curves and contours of a surface, creating a sense of depth and perspective.
They can be drawn with different thicknesses, densities, and styles to convey different effects.
For example, thicker and darker lines can indicate sharper edges or shadows, while thinner and lighter lines can suggest smoother surfaces or highlights.
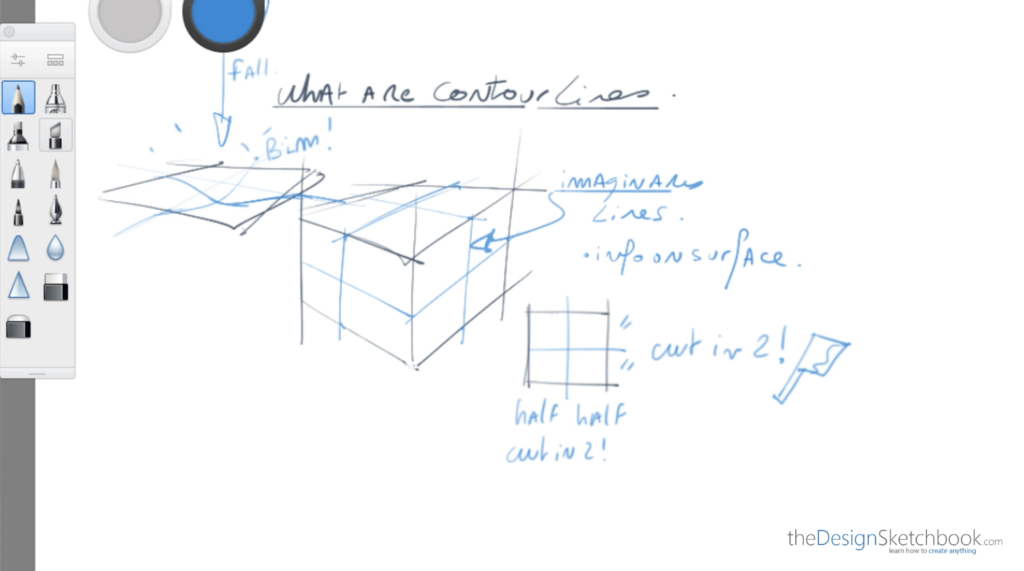
Draw Contour Lines on a Box
To draw contour lines, we split the volume into two equal parts.
Imagine if you were chopping the volume in two!
Chopping the volumes in half with contour lines gives a sense of balance to your drawings.
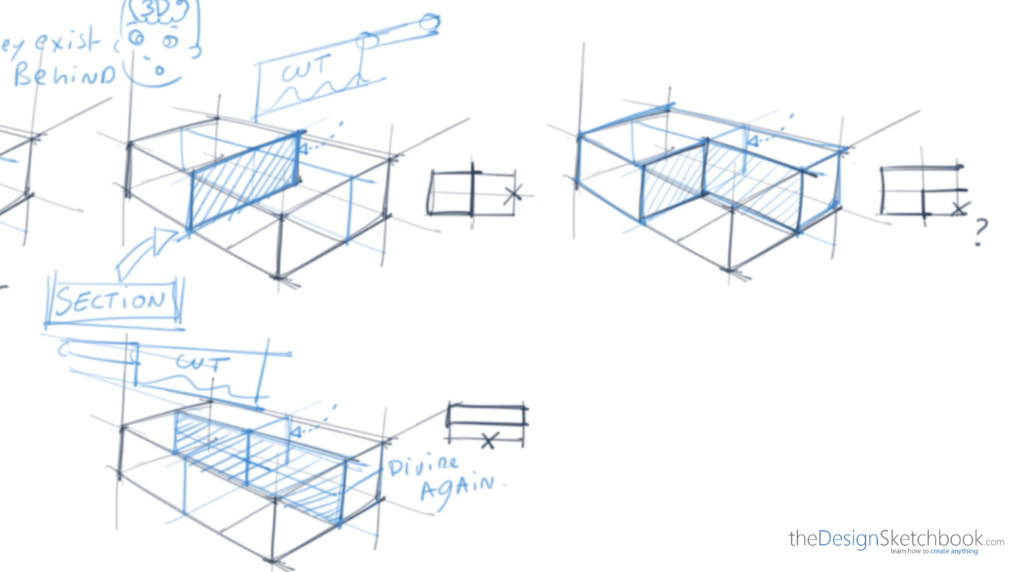
We use simple rules of geometry to divide and subdivide the volume if necessary.
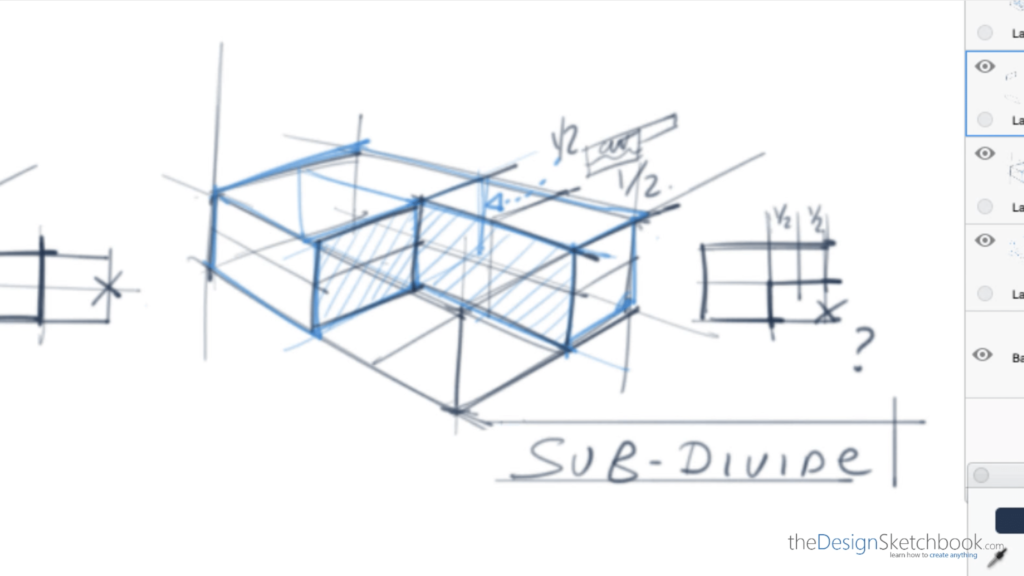
Draw Contour Lines on Organic Forms
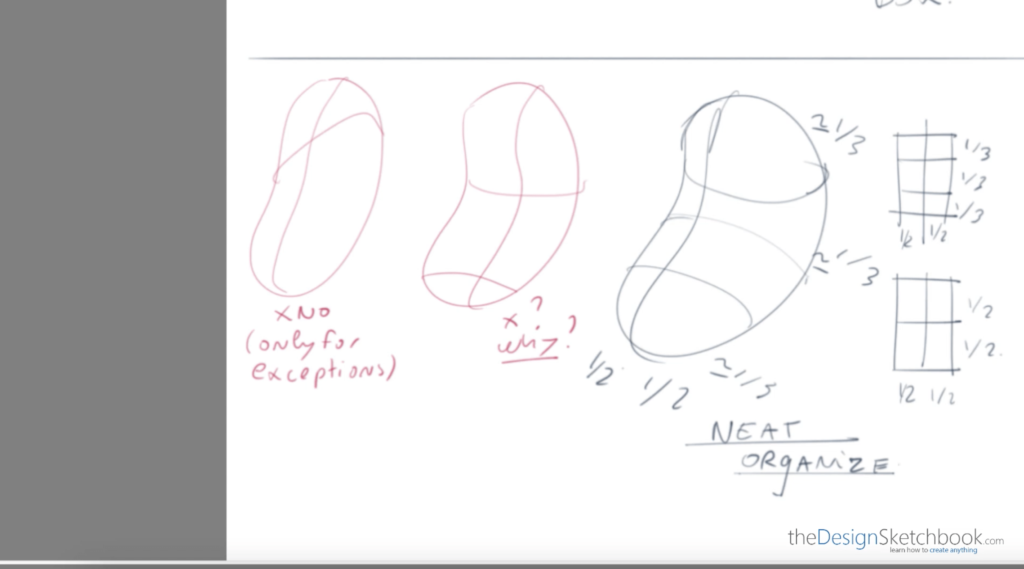
You can divide organic forms as well.
In the picture below we can see how I subdivided the “bean” form in 3 in the vertical direction.
The height being proportionally more elongated, the bean appears more voluminous.
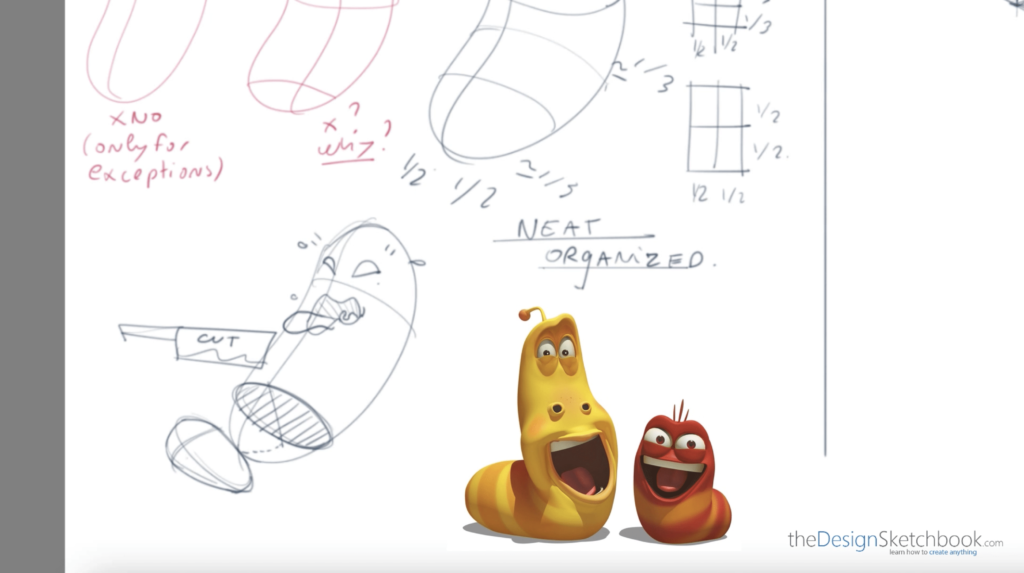
I like to add some facial expressions to some of my random forms.
The bean form reminded me of the cartoon LARVA.
Try it! It is pretty fun.
Use the middle contour line as the axis of symmetry.
Drawing Contour Lines on Cylinders
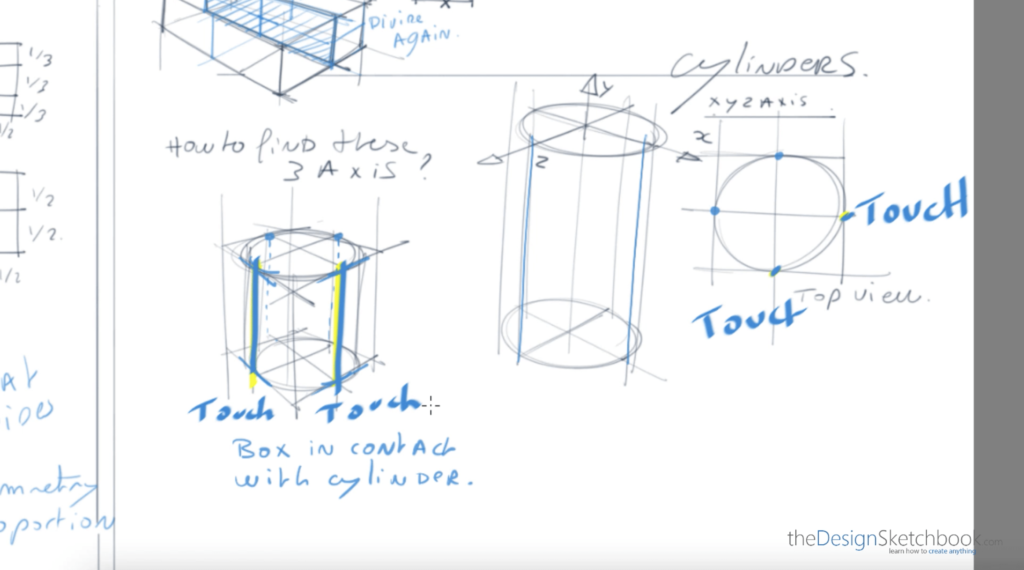
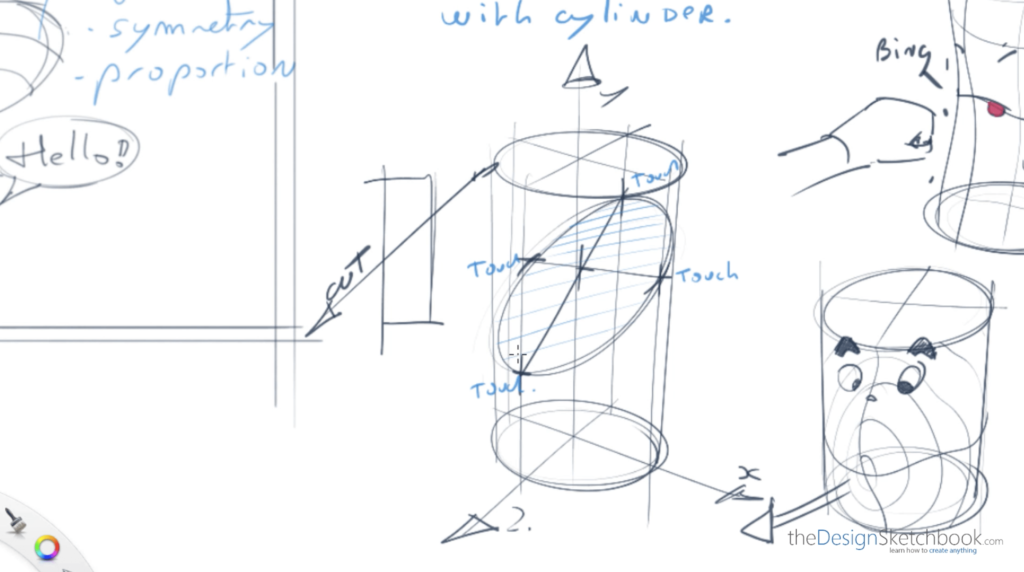
Draw a slanted section drawing an ellipse that uses the contour lines as ‘touching points’
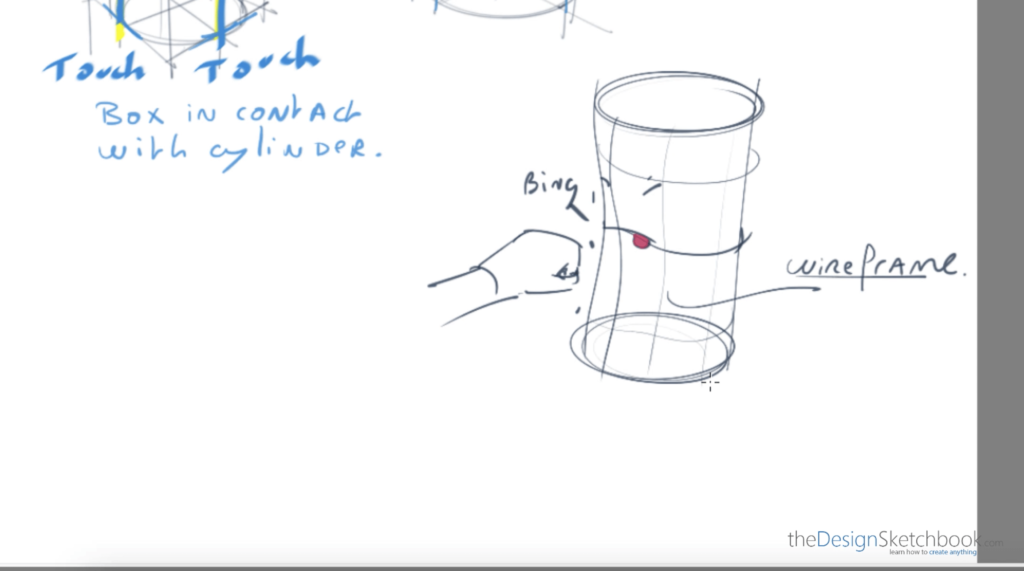
Imagine you apply a force to your volume.
- Imagine you are punching it, and it gets deformed.
- Draw the contour lines to express that 3D form modification.
- Add some extra contour lines all around to create a “Wireframe”
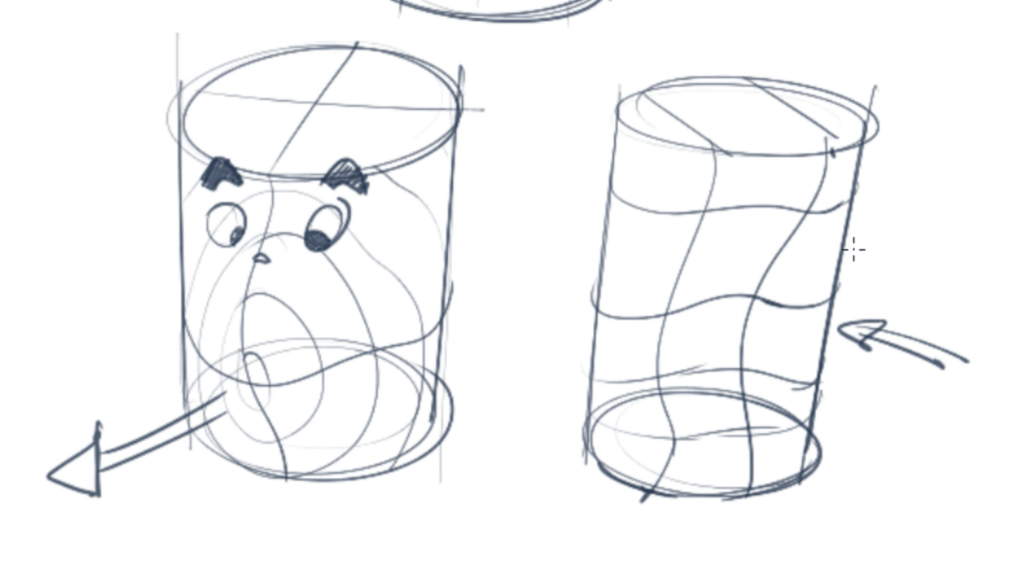
With the contour lines, you can easily signify if it is a bump or a hollow.
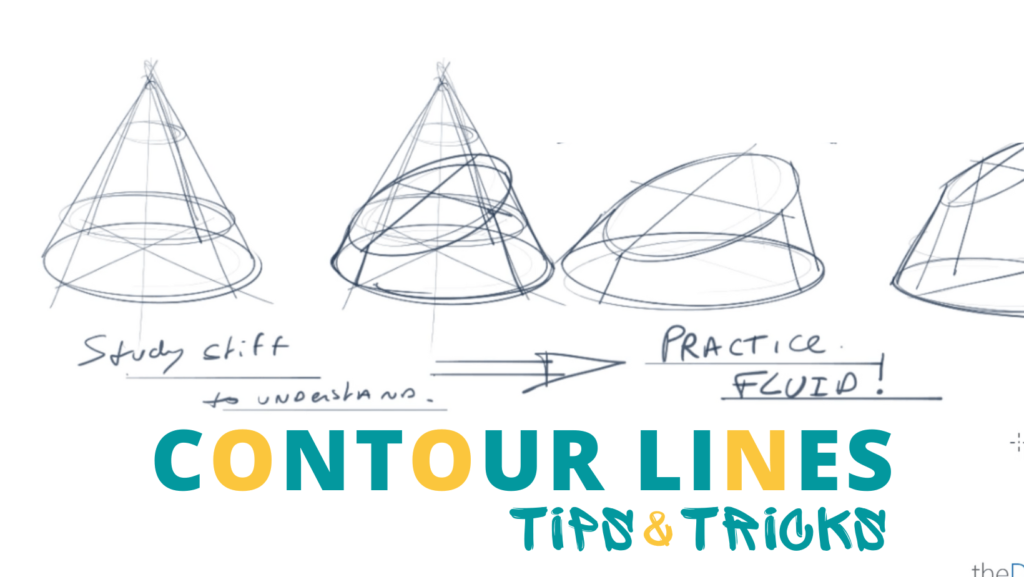
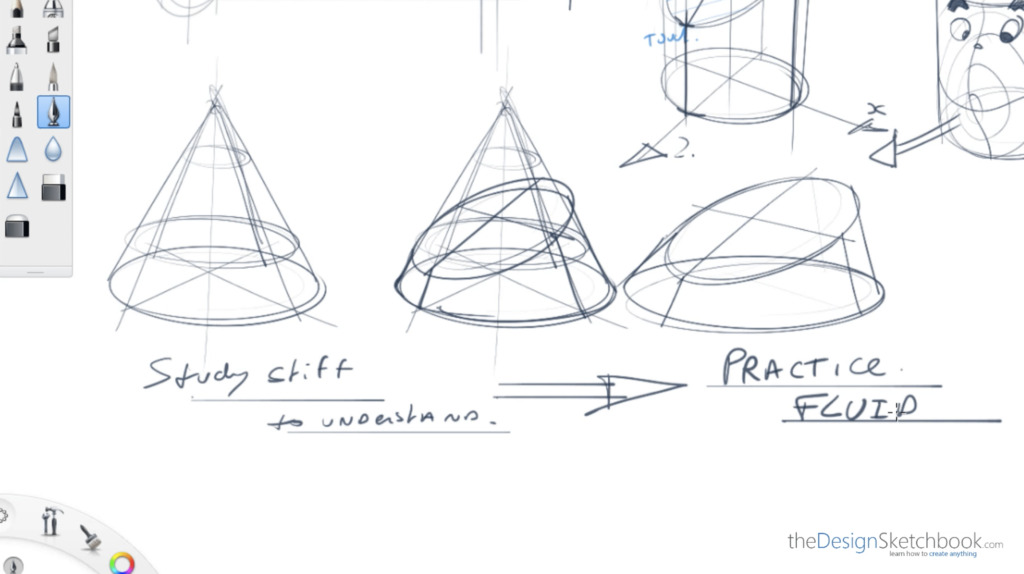
Draw Contour Lines on a Cone
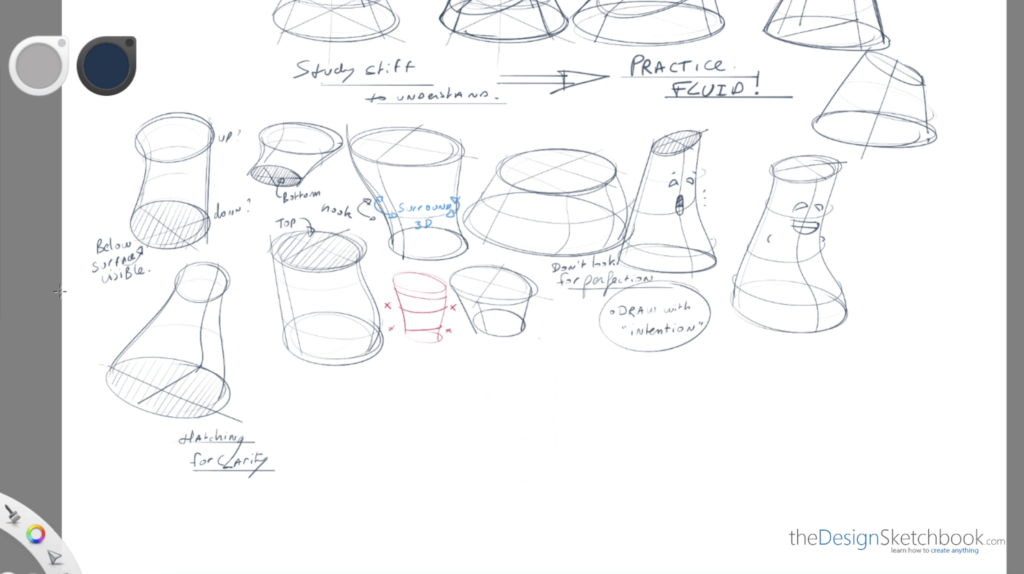
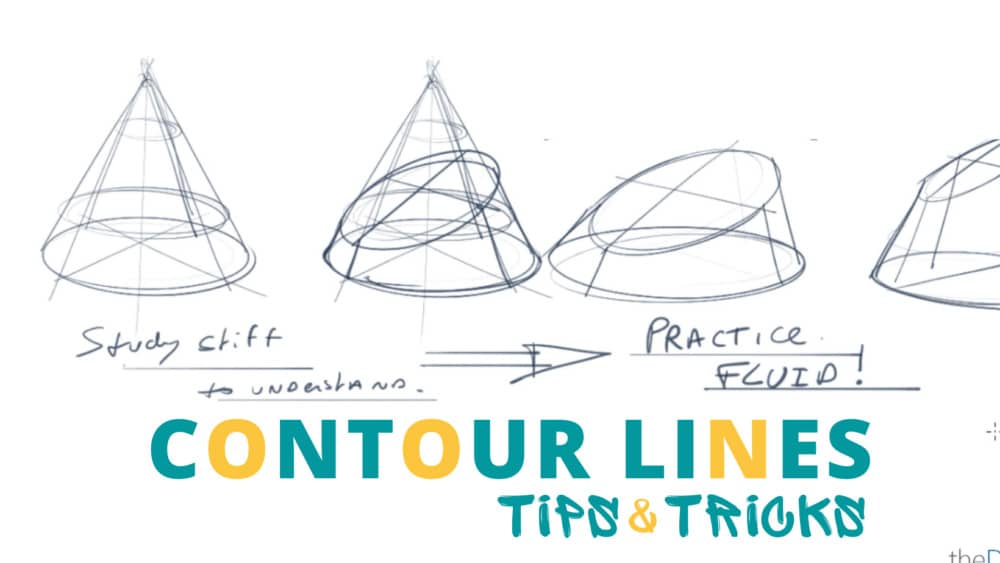
When you draw your basic volumes with contour lines, practice cutting them with sections.
- First, draw the full volume trying to understand how it works. Your lines may be stiff, it’s ok.
- Then redraw it and highlight the part you would like to keep.
- Then redraw only the section part with confidence. Your lines should be more fluid.
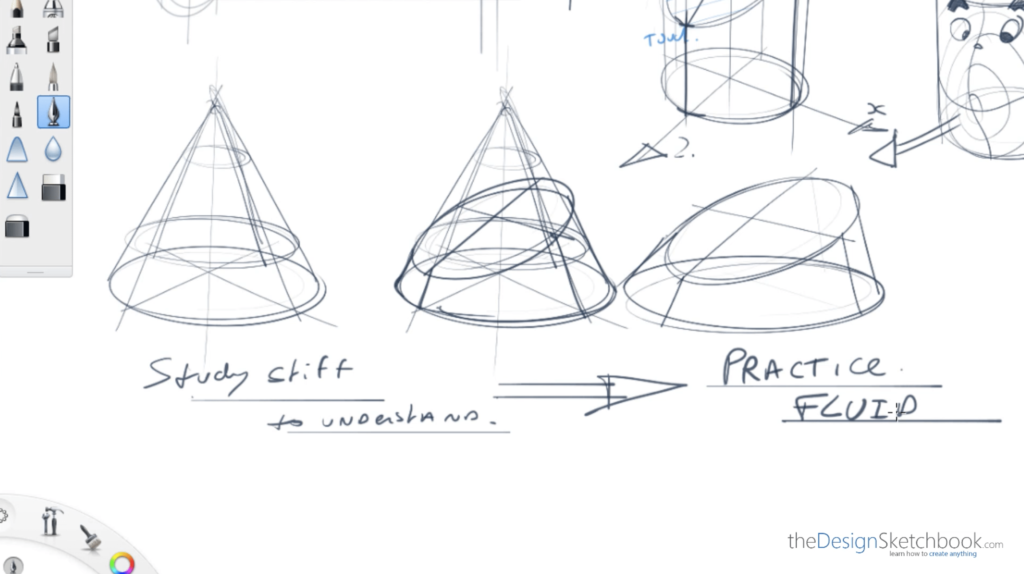
Then only you can start drawing with a “smooth sketching style
Contour Lines Practice Time!
Explore all kinds of forms to apply your contour lines.
Feel free to add some facial expressions to make it more fun!
Let me know in the comments or by email
if you want to learn more about this powerful technique, so I can create more video tutorials on it.
- I remember how much easier drawing became for me using contour lines.
And I believe it will be for you too!
Draw a Maximum of ideas fast using Contour Lines only
As you might know, time management is essential for a professional designer.
He needs to deliver his work on time, and come up with a maximum of ideas!
This tutorial is also a great application of contour lines for random forms.
I invite you to go next with this sketching tutorial:
Create Infinite Drawing Ideas |with the Random Product Technique
Conclusion
In conclusion, contour lines are a powerful tool in the arsenal of any designer looking to convey form, depth, and dimension quickly and effectively in their sketches.
Here are the key takeaways from this tutorial:
- Speed and Efficiency: Contour lines allow designers to sketch and present ideas rapidly, which is essential for meeting deadlines and iterating on designs efficiently.
- Visualization in 3D: By drawing contour lines, you can instantly visualize forms in three dimensions, making your designs more comprehensible and realistic.
- Versatility: These lines can be applied to both simple geometric shapes and complex organic forms, enabling you to capture the essence of any object you’re sketching.
- Practice and Application: Regular practice and exploration of various forms will enhance your ability to use contour lines effectively.
TIP: Add fun elements like facial expressions to organic shapes for a more engaging practice session. - Time Management: As a designer, managing time is crucial. Contour lines help you to draw maximum ideas in a limited time, allowing for more creative exploration and refinement.
Remember, the journey to mastering contour lines involves observation, repetition, and creativity.
Keep practicing, and let these lines become an integral part of your design process.
They are not just a technique but a gateway to a faster, more intuitive way of drawing, allowing you to communicate your ideas with clarity and speed.
Feel free to share your progress or ask for more tutorials on this technique in the comments or by email, and continue to explore the infinite possibilities contour lines offer in your design journey.
Happy sketching day!
See you tomorrow!
Cheers,
Chou-Tac
TRANSCRIPT
Hey guys.
Welcome to the designsketchbook.com. It’s Chou-Tac.
And today, we are going to see contour lines, tips and tricks for designers.
That’s something that you absolutely need to know as a beginner when you learn product design.
So first, what are contour lines?
We are going to see that from a simple box like a cube right here. What you see in blue are the contour lines. Basically, they are some imaginary lines that help you to better understand the surface of the box. They give you extra information. Note that they can also be curvy, giving an organic form. Let’s imagine that you have a ball falling on this surface and BIM! This is kind of distortion that you will get.
We like to draw the contour lines in a geometric way, like horizontal and strictly vertical, so both are going to cross being perpendicular. We cut it half and half. What we like to do as well is to draw the box in transparency. Imagine this is a transparent plastic box, and then the contour lines that are visible right here need to be remembered because they do exist also behind the box on the side that you cannot see. This is just a mind trick that you need to practice to see things in 3 dimensions.
So let’s carry on right here because we like to do that because the components are actually quite useful for cutting your volumes. Like right here, we cut into it. Imagine you have a cake in front of you; rectangle-shaped, and then you just cut it half and half. This part we call the section.
Let’s do the section the other way around. We have it on the longest part of this rectangle. Easy, right? In this little part, we can also add another division with the contour lines. Here, we cut this part; here, we cut that part here. And question mark: How about we want to cut just one quarter of this rectangle? How would you proceed? 3, 2, 1—here we go!
So we just add the hatchings on these surfaces that we want to keep and see the emptiness? That’s why it’s really important to start drawing with very light lines so you can keep what you want to make visible and add extra contour lines right here to subdivide this quarter here. So you make it even more communicative. Feel free to even subdivide it; that’s why it’s very important to be very neat in terms of geometry so you can divide and subdivide much easier.
Remember, there are imaginary lines that work for organic forms and geometric shapes in 3D. You get some sections here; here, you can subdivide if you need to learn and practice the basics of perspective. Feel free to download the designer starter kit in the link below.
Let’s carry on with pins, and we are adding some control lines right here. For the shortest area, have half; for the longest, divide by 3. If you feel so inclined, add half and half if you want to. There is no specific rule to follow but we like it neat, which is why it’s good to avoid something where the lines are slanted or not in proportion.
Here, we can use a contour line as a section; we are cutting these bins—oh! Looks so painful! It looks like the cartoon Navajo! Here is an extra piece that has been cut—oops! So remember when you draw control lines; always try to visualize what’s going on behind so you can try drawing some more right here and see for the face—it’s actually quite convenient to use as a guide.
We look for symmetry and proportion; this is why it’s important to make it as neat as you can. If you imagine that you’ve got this pin in front of you, this would be like horizontal and vertical.
Okay, let’s carry on with cylinders. So cylinders also have these contour lines right here which we draw in transparency. If you see from the top view, they will cross at 90 degrees and you’ll get the axes of x, y, z. But how do you find them? The trick is to think that your cylinder is actually inside the box right here.
On the edges—let’s say where the yellow line is—are actually contact points between the box and cylinder. Imagine a wine bottle inside its packaging; where are the four contact areas of your bottle? Now let’s say something more challenging and fun: imagine your cylinder has been deformed like you’ve punched it! Can you see what appears? It’s a wireframe! Try to get some—you have this illusion of three dimensions.
Let’s carry on some more! As you can see on the right is something more like a hole—it’s like getting inside—and on the left is pulling out; it feels like there is a magnet attracting some parts of it! You see those waves all around? Try to visualize them—it’s like a map of a lens from the top view.
Let’s continue right here drawing some cylinders with XYZ axes shown clearly. Can you see? This vertical dot is totally at center at intersections of contour lines—we’re going to cut it and make it slanted like bamboo! You can get touchy with hatching on areas that have been cut—it’s a little bit more advanced but I wanted to show what you can do with that!
Let’s carry on with cones—we can add some cuts right here now slanting them with cuts as well. Now it’s time to train! Can you see how fluid these lines become? When you’re studying something, it’s quite useful to be neater—to be stiffer—trying to understand what’s going on.
Then as soon as you’ve got it down pat, practice with fluidity! Don’t jump directly into fluidity from beginning or you’ll just go nowhere! Try understanding how things work first before drawing three-dimensionally—that’s how you’ll learn much faster!
So draw some more; practice some more! Here we’ve got another little character which we’re getting an organic body from—so take your time! You can draw as many as you’d like while studying.
I’ll add more links below this video about cylinders so refer back for additional tutorials from our blog where you’ll learn even more! Here’s a trick: On your contour line make sure there’s a hook all around—try avoiding pointy edges because they give your cylinders a flat effect!
Make sure you’re drawing all around with this hook—it surrounds in 3D; that’s why what’s invisible is as much unimportant as what’s visible!
Now I know it can be quite overwhelming so let’s add hatching too—to draw surfaces ensuring clarity over what lies below versus above okay? See there? A better viewpoint of your object—it’s little tricks like these that add clarity into your drawings!
Alright! I hope you’re having lots of fun! So don’t look for perfection at this stage—draw with intention; draw with fluidity in mind! At beginning stages seek geometrical forms while looking for surface form using contour lines—you’ll discover sections applicable for both organic forms as well geometric ones!
Here we’ve got bins—a geometry base which after deformation gives rise toward an organic surface—we love mixing them up! This way theory transitions into exercise: study stiff then practice fluidly!
Alright? Train as often as possible & visit our blog inviting further tutorials along your journey—here’s your designer starter kit & access tutorials such as drawing straight lines too!
Dive into those exercises getting confident within those strokes & I’ll catch ya next video—bye-bye!






Add comment