How to Draw an Infinity of Products (with ellipses and cylinders)
Transcript below
Hey guys
Welcome to the “Sketching Mini-Tutos”!
Sketching from Chouchou from me, Chou-Tac.
So how to draw an infinity of products using ellipses and cylinders.
Alright,
we are going to draw some quick doodles right here
to see what we can draw.
So here are the basics:
one axis, two ellipses and you connect.
Then this is a PRINGLES box.
Do you know Pringles?
These chips that you can eat in the cylinder box.
You can find them in different sizes.
As you can see here we are going to draw a small logo here.
So it get more meanings for us.
This is basically the logo with the big mustache of Mr. Pringles!
My cylinder is a bit slanted for this doodle and we can we adjust it a bit.
If we want to.
But for these cases,
just to show you to communicate that
you can do different sizes of pringle box
and each of them has different usage.
You can get a small one for the more portable.
The middle one is for the basic
and the slim one which is more like let’s say diet packaging.
When you draw cylinders,
remember that
there is a difference between the top and below ellipse.
The one on the top is thinner and the one in the middle is bigger.
So the three steps: Axis, ellipses and connect.
This is the ultra-simple way to draw cylinders.
With these cylinders,
we can draw more things!
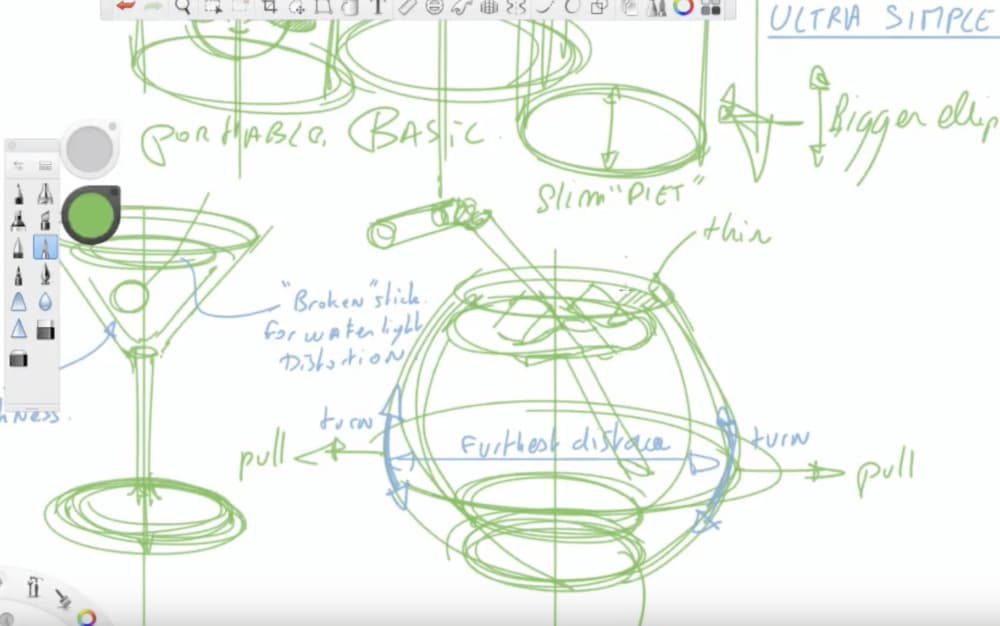
Like here is a cocktail glasses.
We did exactly the same things:
Axis, ellipses and then you connect.
It is just that some ellipses or bigger than others.
Here I’m drawing
the cherry inside with some alcohol inside.
And I want to “break” the stick
so it gives a sensation of reflection on the water.
Let’s say…
How do we call that?
There are diffractions in the lights?
Distortion of the light let’s say.
And yeah don’t forget the water or the thickness.
I can see that
my bottom ellipse is not as wide enough.
So this is magic with sketching
is don’t try to look for perfection when you doodle,
but feel the curves. right here.
Like I draw as you can see the middle ellipse
It is actually where it’s the widest area.
You have to feel you’re pulling the curve going out.
Okay?
It is really like a mental trick.
You do not only visualize on paper what you want.
You have to feel that tension.
You want to know that this wide area
is actually
where the curves are turning
on the left and all the rights
because this is the furthest distance
on the side of this glass.
Okay?
Now let’s draw the thickness here
which is thicker at the bottom
because it’s something which is more heavier.
Let’s add some ice cubes inside and a straw.
So the straw is also going to be broken
for the light distortion inside.
Let’s add a bit some hatching for the inside view
which is totally optional.
You can draw an infinity of kind
of glasses that you want.
Here is some Champagne.
Choose the length of the sticks and so on.
It’s total freedom.
Some bubbles.
Explore some forms and sizes.
Do not only draw the one I’m showing you here.
Go and explore as many as you want.
Always think of
Remember about the story of your glass.
Okay?
Is it for cocktails?
Is it for cognac?
Is it for water?
And so on…
Let’s see some common mistake
that we see from beginners.
It’s that you are drawing some pointy edges of the cylinders.
This is more like drawing what you see.
But we have to visualize
seeing through to avoid this flat version of the cylinder.
Okay?
Mistake number three is:
The Tower of Pisa.
Which is like a cylinder that is just slanted in that way.
So how to solve it?
Always start with the axis of symmetry,
which is also called the MINOR AXIS.
Then you connect them .
So slim ellipse on the top,
thicker below.
Here is a simple trick.
If the paper is in front of you like,
this is going to be difficult
if it’s parallel to your body.
But what you have to do
is to slant your paper to 45 degree
aThen you will get a natural position of sketching.
Okay?
This is going to make the whole difference.
Alright.
It is like that.
You got the 45-degree and very natural.
and if it is vertical like this,
you will maybe draw a potato shape.
Okay?
Remember that the ellipse also plays with symmetry.
Alright.
In the cylinder,
you have to think of
a lot of series of disks piling it on top of them.
Let’s recapitulate
You have a fast method here to draw the cylinders
which is easy to modify
and create as many shapes as you want.
Always think of the story that will give you the shape.
Always see in three dimensions
so you can see through your forms.
So you won’t get flat but in 3d volumes.
Always think of STRATEGY when you’re drawing
and if you want to go further
like on this tutorial
you need to draw
with multiple angles by drawing inside the box.
The cylinder inside the box is like this.
Just give you a very quick preview here.
and here we go.
all right so see you in the next videos!
Bye-Bye!
So feel free to download
the Beginner guide as well in the blog.
You have the link inside the description.
So you can make your first steps in design sketching
getting the right habits from the pros.
All right.
See you.
Bye-bye.
Hello guys !
My friends call me Chouchou, I am a Product designer 🙂
To get started in design sketching, I invite you to download the Designer Starter Kit : The Designer Starter Kit (PDF)
FACEBOOK: http://www.facebook.com/thedesignsketchbook
INSTAGRAM: http://www.instagram.com/thedesignsketchbook
To contact me, simply send me an email at choutac@thedesignsketchbook.com 🙂
What the Designer Starter Kit book will teach you ?
The Book includes 4 simple guides I made for True-beginner designers.
With this step-by-step method, you will prove to yourself that you can sketch. Some techniques may appear simple. Do not underestimate them, as a designer you will use them every day.
Receive 1 guide per day
DAY 1 | 5 essential tips before starting
DAY 2 | Straight lines and perfect circles
DAY 3 | Sense of proportion
DAY 4 | Cubes in Perspective
Sere you there !
Cheers,
Chouchou.


Add comment