What you draw does not look alike your ideas?
I’ve prepared a simple tutorial for all beginners who have difficulties drawing from imagination.
I show you that “Guessing” is not the proper way to draw.
Drawing the right way is about the method I show you step-by-step.
If you want to know how to use your imagination to draw, you need to study the basics of perspective first. It will help you structure your vision in 3D so you won’t draw only flat drawings anymore!
How to Start Drawing from Imagination: A Beginner’s Guide to Basic Perspective
Hey there, creative souls!
It’s Chou-Tac,
Do you have a mind full of ideas but struggle to translate them onto paper?
Fear not, because today, we’re embarking on a fun and simple journey to help you draw from your imagination like a pro!
So, What’s the Issue?
Many of us, like my neighbor Bilitis, believe that drawing is an innate talent.
But let me tell you a little secret: It’s not! Anyone with the belief and method to learn can succeed in drawing their ideas from imagination.
Yes, you heard that right!
Step-by-Step Guide to Drawing from Imagination with Basic Perspective
Learn the Basics:
Start by understanding the fundamentals of perspective. This isn’t just about making your drawings look 3D; it’s about giving structure to your creative vision.
Drawing flat, lifeless pictures will soon be a thing of the past!
Draw from Life:
Sketching real objects from different angles helps you understand how they appear in perspective. This practice trains your brain to visualize in 3D.
Practice with Simple Objects:
From cubes to cylinders, start with basic shapes. They’re the building blocks of all complex designs.
Visualize in 3D:
Before drawing, take a moment to visualize your idea in three dimensions. Imagine how light would hit your object, how shadows would fall, and how lines converge to vanishing points.
Use Your Imagination:
Let your mind create a 3D space where your ideas can come to life.
Draw a Master Cube:
A master cube is your guide to understanding perspective. It helps you see how different angles and proportions look in 3D space.
Transform the Cube:
By manipulating the master cube, you can create any object you imagine.
Add Details and Volume:
Once you’ve got the core form, add details like shading, texture, and accessories to give your sketch life and depth.
Experiment and Play:
Perspective isn’t just about rules; it’s also about breaking them! Experiment with exaggerating proportions, bending lines, or changing angles to make your drawings more dynamic.
Tips for Success
- Be Patient: Rome wasn’t built in a day, and neither will your ability to draw from imagination. Give yourself time to learn and practice.
- Embrace the Journey: Enjoy the process of learning. Every sketch, every mistake, is a step towards mastery.
- Seek Inspiration: Look around you for inspiration. From everyday objects to nature and architecture, everything can spark your creativity.
- Get Feedback: Share your work with friends, family, or online communities. Feedback is crucial for growth.
Why Perspective Matters
Understanding perspective isn’t just about making your drawings look good; it’s about giving them depth, volume, and a sense of being. It transforms your sketches from mere 2D representations to dynamic, lifelike creations.
Conclusion
So, future design maestros, let’s wrap this up with some inspiration:
- Believe in Yourself: Talent is overrated; dedication and a love for learning are what truly matter.
- Practice: The more you practice, the better you’ll get. Start with simple exercises like the Designer Starter Kit to train your lines and grasp basic perspective.
- Have Fun: Never forget why you started drawing. To bring your imagination to life, to solve problems, and most importantly, to enjoy the creative process.
And hey, if you’ve enjoyed this beginner’s guide to drawing from imagination or have any questions, drop a comment below or let me know if you’d like more tutorials like this. Let’s keep sketching together, and soon, you’ll find yourself not just drawing, but mastering the art of imagination!
Happy sketching!
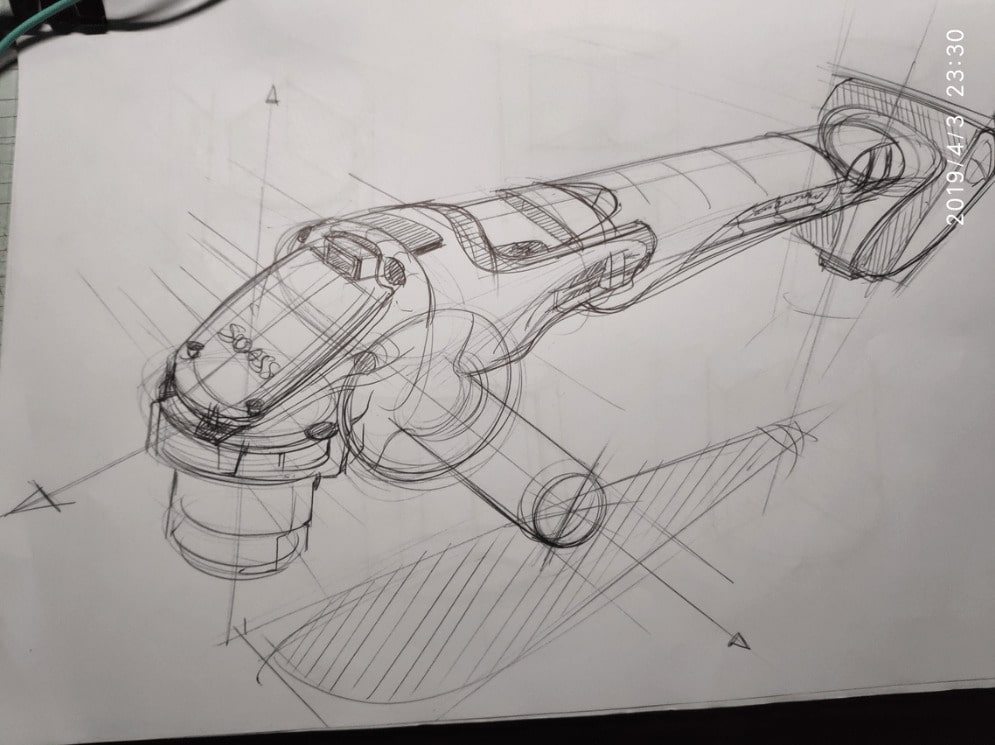
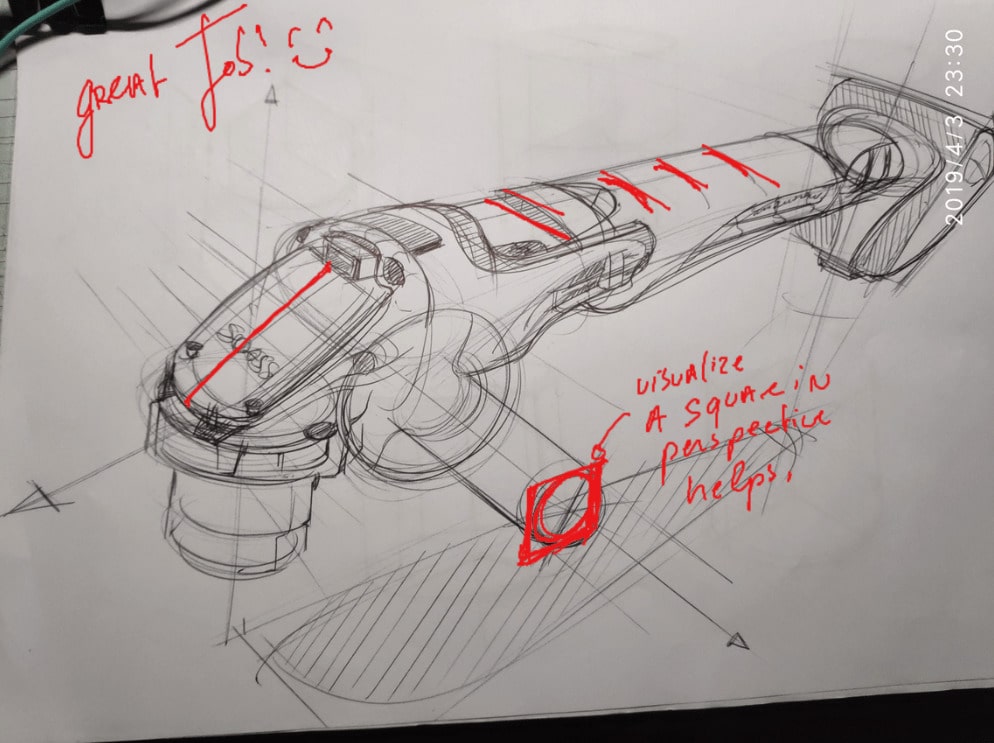
PS: Johnson, a VIP member of my course Sketch Like The Pros has just sent me a sketch he did from a recent sketching video I published on How to draw in perspective a Grinder.
I thought it would be inspirational for you to see his progress.
(24 SKETCHING TIPS)
TRANSCRIPTION
Hey, guys. So today, we are going to see how to start drawing from imagination with a beginner level tutorial. So welcome to the design sketchbook.com. I’m Chou-Tac. I invite you to subscribe to the blog and to the channel so you will receive some new tutorials in your emails.
As product designers, what is really essential is to be able to draw from imagination and not just copy other people. There is something that I was actually just recently sharing with my neighbor: she was thinking that sketching is all about innate talent, that we were born with it or we were not born with it. This is a common mistake made by passionate people who love to draw. Whenever they draw, they’re trying to guess, and they end up with awkward sketches like this one, whether they want to draw a cube, triangles, or some more complex forms. It’s not in perspective; everything gets awkward, and you don’t really know why.
The more you draw, the more you can transition from disappointment to panic. Basically, you are not alone in feeling that you can’t draw. This is why I would like to share with you today’s tutorial, which is actually all about a simple solution: a mix of perspective and simple geometry. These two concepts are actually a very nice couple, and I will show you step by step how you can get started. This will help you gain your first confidence and show you that if you think you don’t have that gift or if you think that you will never be able to draw but have the willingness to, I will show you that you can.
These first steps are actually what every designer needs to know when they need to draw. Alright, so let’s start the tutorial. We begin with the horizontal line, which is called the horizon line. Then you draw two dots far apart; the left dot is called the vanishing point on the left. So my nose is a bit stuck; I’m seeing these days, but let’s do this tutorial here. The right dot is the vanishing point on the right.
From there, you have to draw a vertical line. Choose a vertical line between them—not too close to one of them—and choose a height. Then join it to the vanishing points. You can find all these steps in the designer starter kit that you can get in the beginner guides. You can download and claim your guides for free in the description below the video. This is where you can get all this basic tutorial of perspective step by step.
You will also learn how to do straight lines with some exercises included there. So, see the right edges? You prolongate them towards the left vanishing point. The left edges will then be joined to the other side. When doing that, draw the back line here which should be vertical as well. If yes, it means you’ve done a great job! Let’s call this AA prime to give you a line—that’s great!
Alright, so we got this cube here—this box—in perspective because when you want to draw from imagination and stop guessing, you have to visualize in 3D. To train that vision with 3D visualization, you have to draw some simple boxes in perspective because all boxes are actually the base of everything in design sketching; they are foundational for any form.
I think my nose is so stuck; I feel like I’m speaking like a duck! So let’s copy and paste this and then create something more interesting here. We want to take this box as our next step: we are going to do a 3D form inside like a triangle from the 2D view and then transform it into a 3D view.
Let’s say we want—we are going to draw—the proportion with a simple square representing one of the sides of the box. Draw the diagonal and then create this triangle. Okay? So we got these steps and we just need to reproduce them on one of the sides of this box.
Let’s label these three dots LMP here and then just reproduce them by joining those L and P dots together. On the back side, we note there’s an A prime version: L prime, M prime, and P prime—all connected! Now all that’s left is connecting them—that’s it! Simple, right?
It’s just about saying that when you go step by step with perspective and simple geometry—especially using diagonals—you don’t have to guess anymore! This was something you were able to do just a few minutes ago; now look at what you’ve accomplished!
Feel free to pause the video at any time and write things down as necessary! If you’re drawing on paper, use an overlay technique: draw this set on one sheet of paper, place another sheet over it, and use it as an overlay guide. If you’re working on Photoshop, just create an extra layer.
Alright! Let’s continue with another form now—let’s draw this square box surface—and let’s say we want it shaped like a crown! Draw your diagonal again and then sketch out this crown shape.
Diagonals are very essential in product design because most products you’ll be drawing will be symmetrical—meaning whatever you’re drawing has been duplicated from both sides—left side and right side—and drawing diagonals allows for having symmetry in your work as well as establishing an axis of symmetry.
Remember: start drawing with a square or box shape first followed by adding diagonals since they’re crucial! What’s great about diagonals is that they’re very basic concepts most of us learned back in primary school.
Now as expected, we’re going to connect this 2D crown into 3D! Remember always have fun while drawing simple forms because when moving onto more complex stuff later on—it won’t seem impossible! It’s simply an accumulation of many simple steps put together sequentially.
So we’ve connected our diagonal nodes now; let’s reproduce that crown shape atop our front surface while repeating everything behind as well! Yay! Let’s celebrate our success here!
Then we can mirror that same thing on the back side too—and once again—you’ll see I’m not guessing anything; all those perspective lines I drew allow me simply connect them together!
This proves it’s not about innate talent or gifts; anyone can do it! Just remember: see things transparently—it’s like having x-ray vision enabling sight through objects—which aids connecting different dots from front view through back view!
It becomes quite engaging—a game similar perhaps—to Sudoku or mind trick puzzles where proper techniques eliminate guessing altogether! People may seem phenomenal at drawing but they’ve learned effective methods over time—dedicating themselves consistently—to apply these techniques.
At first your pace may feel slow but practice makes things intuitive over time! As seen here—I’m bolding lines for highlighting volume—using various colors throughout tutorials—but when using simple paint techniques start light before gradually increasing pressure for clarity while allowing construction lines becoming almost transparent!
It’s all about very simple geometry so don’t fear drawing again! And remember—you’ve got access here all steps laid out clearly before concerning those perspective lines along straight ones available via designer starter kit downloadable from below video description!
This way I’ll send more tutorials directly into your inbox regularly too—so let’s redo same process again but now rotating our crown by 90 degrees—can see? No need for imagination here either—just connect dots once again—it feels magical!
And practicing cubes within various perspectives trains your 3D divisions enabling ability without needing extensive sets—but for now let’s focus on building habits through repetition since practice yields results only when done correctly!
When people tell it’s merely practice—they often overlook importance proper methods employed otherwise frustration arises instead—as seen earlier—leading only back toward panic without clarity on how best proceed forward!
Now because we’ve reviewed these steps—you might even attempt drawing above horizontal line itself symbolizing product positioned overhead where eyes naturally rest level-wise…
When box appears above eye-level—you observe bottom structure while below allows top visibility…simple enough right?
Take note how elongated box appears reflecting proportions being key aspect overall art…remember make every moment pleasurable since creating progress matters greatly!
Adding hatching enhances contrast further still while introducing another form drawn from distinct angles…where hatch lines represent cut surfaces…again emphasizing precision through straight-line training yielding clearer results long-term…
So let me add yet another type box example here…starting lightly then progressively bolder as needed duplicating shapes accordingly while ensuring each diagonal aligned oppositely…then sketch desired outline shaping precisely chosen basis…
You’ve selected simplest shapes initially—but feel free experiment harder versions later once comfortable building initial foundations solidly established thereby avoiding overwhelming yourself prematurely!
Celebrate small victories along journey continuously enhancing momentum surrounding motivation & love for creativity allowing visible progress flourish over time—even if perfection remains elusive initially—it truly unfolds steadily throughout ongoing learning experience…
Ultimately understanding logical geometric steps matters far more than innate gifts bestowed upon individuals deemed ‘talented’ naturally henceforth illustrating ability develop skills effectively lies within reach indeed…
So embrace newfound capability constructing perspectives geometrically eliminating prior guessing game entirely transforming imagination into tangible concepts effortlessly now…you’re well-equipped ready embark upon creative ventures ahead!
Hope enjoyed today’s session encouraging exploration further upcoming videos & participate actively within cube challenge dubbed “Cube Mania Challenge!” See ya next time!






[…] by learning something simple, with the Basic fundamentals of drawings. Start drawing, lines, square, circles… your eyes and your hand will start to calibrate each […]
[…] work with a canvas much bigger than needed. Somehow, the bigger your canvas will be, the more your imagination will be […]
Hello,
I find your site truly awesome. How do I become a member and start design sketching with your course? I am unemployed and have no money to pay for a design course. Thanks very much. Kenneth